The Gap Nobody Talks About
You’ve seen it happen. Someone spends weeks modeling a perfect interior scene the geometry is clean, the textures are sourced from real-world scans, the camera angle is carefully composed. Then the render comes out, and it looks like a video game screenshot from 2009. The furniture is accurate. The proportions are right. But something fundamental is missing, and most people can’t name exactly what it is.
It’s the light. Not the presence of light there’s plenty of that but the quality of it. The behavior of it. The way it wraps around a linen cushion or grazes the edge of a marble countertop. High-end architectural and product photography doesn’t just illuminate a scene. It sculpts it. And the photographers and art directors behind those magazine spreads have spent decades learning how to do that with physical equipment, physical space, and an intuitive understanding of how light moves through the real world. Replicating that in a virtual environment requires understanding not just the tools inside your rendering software, but the underlying logic those photographers are working from.
Why Magazine Light Feels Different
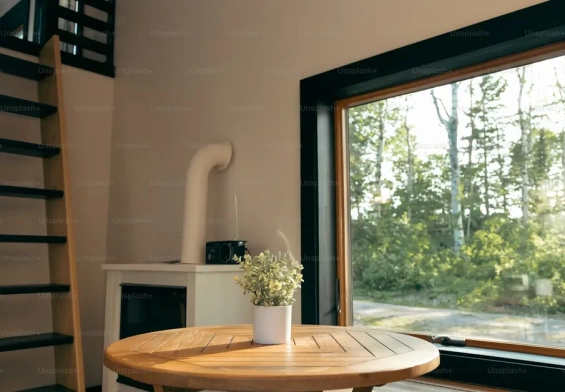
Open any issue of Architectural Digest or Wallpaper and pay attention to what you actually see. The highlights are rarely blown out. The shadows are deep but never completely black there’s almost always some detail surviving in the darkest corners. The transition between lit and unlit areas is gradual, sometimes spanning the entire width of a wall. This isn’t an accident of photography. It’s the result of extremely large, diffused light sources placed very close to the subject.
In physical photography, this means softboxes the size of doors, or shooting near floor-to-ceiling windows on overcast days. The sky on a cloudy afternoon is essentially a perfect light source enormous, even, and completely diffused. It wraps around objects rather than casting hard-edged shadows. When you replicate this logic in a 3D environment, the instinct of most beginners is to add an HDRI, crank the sun intensity, and call it done. The result is almost always too contrasty, too harsh, and missing the layered quality that makes editorial photography feel expensive.
The secret isn’t more light. It’s softer, larger, closer light and understanding that every shadow in a high-end render is a deliberate creative choice, not a byproduct of where you happened to place your light source.
The Architecture of a Professional Lighting Setup
Studio photographers and cinematographers talk about three-point lighting as a foundational concept, but editorial interiors work from a different logic. Rather than isolating a subject with a key light, fill light, and rim light, magazine-quality interior renders tend to use a primary ambient source combined with one or two carefully placed accent lights that suggest a narrative about the space.
Think about what that means practically. Your primary source whether it’s an HDRI sky, a large area light positioned outside a window, or an emissive plane simulating an overcast exterior should be doing most of the heavy lifting. It should establish the overall mood, the color temperature, and the soft shadow direction. This source alone, if done correctly, can make a render feel coherent and real.
Then comes the part most people skip entirely: the secondary accent lights. In a real magazine shoot, a photographer might bring in a small tungsten light hidden behind a piece of furniture to add warmth to a corner, or use a reflector panel to bounce a little extra light onto a tabletop that’s falling too dark. In your render, this translates to small, low-intensity area lights placed strategically not to flood the scene with brightness, but to lift specific areas just enough that the eye travels through the image the way you want it to.
The difference between a render that looks like a render and one that looks like a photograph often comes down to this layering. One light source produces a technically correct image. Multiple carefully calibrated sources produce something that feels lived-in and considered.
Color Temperature Is a Narrative Tool
Here’s something that rarely gets discussed in tutorial content: the most compelling magazine images almost always contain a deliberate tension between warm and cool light. It’s not something you consciously notice, but your eye responds to it immediately.
A room flooded entirely with 5500K daylight looks clean but sterile. Add a lamp in the corner running at 2700K, and suddenly the space has a story. There’s a time of day implied. There’s a sense that someone lives there. The cool light suggests the outside world; the warm light suggests shelter, comfort, intimacy. Magazine photographers understand this instinctively. They’ll let a window’s blue-white daylight compete with the amber glow of a floor lamp, and the resulting image feels cinematic without anyone being able to explain why.
In your rendering workflow, this means resisting the urge to make everything consistent. Consistency is a technical virtue, not an artistic one. Let your interior light sources run warmer. Let your exterior sources run cooler. Allow the two to mix in the midground of your scene, and you’ll find that the image suddenly has a dimensionality that pure technical accuracy never produces.
What Exposure Is Actually Doing
Physical cameras don’t see the world the way human eyes do, and neither do render engines when they’re set to their defaults. One of the most underestimated aspects of making renders look photographic is understanding exposure not as a brightness slider, but as a tool that shapes which parts of your scene carry information and which parts surrender to darkness or light.
Magazine photography tends to be exposed for the midtones. The highlights might clip slightly on a window frame or a glossy surface, and that’s acceptable even desirable. It signals that the light source is genuinely bright, which reads as real. Conversely, deep shadows that lose all detail signal depth and volume. The mistake most renders make is trying to preserve information everywhere, resulting in an image that looks technically complete but emotionally flat.
In practice, this means deliberately letting your windows blow out if the exterior is bright. It means allowing the underside of a sofa to go genuinely dark. Render engines give you total control over exposure, and that control should be used with the same intentionality a photographer brings to choosing their aperture and shutter speed on set.
The Material-Light Relationship Nobody Mentions
Lighting doesn’t exist in isolation. The way light behaves in your scene is inseparable from the materials you’ve built, and this is where many technically proficient renders still fall short. A perfectly crafted lighting setup will reveal every flaw in a material, and a beautifully constructed material will look wrong under careless light.
Magazine-quality surfaces linen, brushed brass, matte plaster, polished concrete all have specific behaviors under soft diffused light. Linen should show subtle surface variation, catching the light slightly differently across the weave. Brushed metal should have a directional quality to its reflections, elongated along the grain. Matte plaster should feel like it absorbs light rather than reflecting it, creating a soft, chalky quality that’s immediately recognizable.
Getting these right requires testing your materials under your final lighting conditions, not under a neutral studio sphere. Build your lights first, then refine your materials in response to what you see. The relationship is bidirectional the light reveals the material, and the material shapes how the light feels in the space.
Render Once, Composite Always
The final piece of the puzzle is one that separates hobbyist renders from production-quality work: compositing. The images you see in high-end magazines are almost never straight out of camera. They’re composited multiple exposures blended, color graded, sometimes with elements replaced or enhanced in post. Your renders should be treated the same way.
Rendering out separate passes beauty, shadow, reflection, ambient occlusion gives you the ability to make decisions in post that would be impossible to achieve by adjusting lights alone. You can deepen shadows without losing highlight detail. You can add a subtle glow to a lamp without affecting the rest of the scene. You can push the color grade toward the warm, slightly desaturated palette that editorial photography favors without baking those choices into the render itself.
This is where the gap between a good render and a great one often lives not in the 3D software, but in what happens after the render button is pressed. The photographers whose work fills those magazine pages have a complete post-production workflow that’s as considered as their on-set lighting. Your virtual renders deserve the same level of attention.
Light in the best editorial images never announces itself. It simply makes everything look inevitable as if the space could only have ever existed in exactly that quality of illumination. That’s the standard worth chasing.