There’s a particular kind of neglect that happens to decks every fall. The last barbecue gets packed away, the cushions disappear into the garage, and the deck itself that platform you spent all summer living on gets quietly abandoned to whatever the sky decides to throw at it. By March, you’re looking at warped boards, cracked sealant, and rust-stained hardware, wondering what happened.
What happened is winter. And winter, when it comes to outdoor wood and composite structures, is less a season than a slow demolition project.
The good news is that a few hours of deliberate preparation in October or November can mean the difference between a deck that greets spring looking tired and one that greets it looking almost exactly as it did when you left it. The process isn’t complicated. It just requires actually doing it.
Why Winter Is Harder on Decks Than You Think
Most people understand that cold is bad for wood. What they underestimate is the freeze-thaw cycle the real villain of the story. When water seeps into the grain of a board and then freezes, it expands. That expansion creates micro-fractures. The water thaws, contracts, and then the next freeze pushes those fractures a little wider. Do that forty or fifty times over a winter, and you’ve got boards that are structurally compromised even if they look fine from the surface.
Composite decking isn’t immune either. The polymer-wood blend that makes composite boards so appealing in summer can still absorb moisture at the seams and fastener points. Ice can work its way under surface coatings. And the hardware screws, brackets, post caps is often the first thing to show damage, because metal and wood expand and contract at different rates.
The freeze-thaw cycle also attacks sealants. A sealant that was perfectly intact in September can develop hairline cracks by January, and once water finds those cracks, the damage accelerates. This is why winterizing isn’t just about covering things up. It’s about closing every possible entry point for moisture before the temperature drops.
The Inspection You Can’t Skip
Before you do anything else, get down on your hands and knees and actually look at your deck. Not a casual glance from the back door a real inspection.
Check the ledger board first. That’s the board connecting your deck to the house, and it’s the most structurally critical piece of the whole structure. Look for signs of rot, soft spots, or gaps where water could pool. Run your hand along the flashing the metal strip that seals the ledger to the house and make sure it’s still tight. A compromised ledger in October becomes a dangerous ledger by spring.
Walk the surface boards and press down with your foot at each one. Any bounce or flex that feels wrong probably is wrong. Probe suspicious spots with a screwdriver; if it sinks in easily, you’ve got rot. Better to find it now than after a winter of ice has made it worse.
Check every railing post for wobble. Grab it and push. A post that moves even slightly needs to be re-secured before freeze-thaw cycles work the fasteners loose entirely. Look at the stair stringers, the joists underneath if you can access them, and the condition of any post bases sitting on concrete footings. Water pools at those contact points, and that’s where rot tends to start.
Document what you find. Even if you’re not fixing everything this season, knowing what’s there means you’re not surprised in spring.
Cleaning Before the Cold Hits
A dirty deck going into winter is a deck that’s going to look worse coming out of it. Organic debris leaves, dirt, pollen, bird droppings holds moisture against the surface and creates the conditions for mold and mildew to establish themselves under the snow.
Sweep everything off, then get into the gaps between boards with a putty knife or a specialized deck tool. Those gaps exist for drainage, and if they’re packed with debris, water has nowhere to go. A pressure washer can be useful here, but use it carefully too much pressure on older wood raises the grain and creates more surface area for moisture to penetrate. A medium setting, held at a reasonable distance, is usually enough.
If you see any mildew staining, treat it with a deck cleaner before you seal. Sealing over mildew doesn’t kill it; it just traps it. The stain will come back darker, and the mildew will continue working on the wood underneath.
Let the deck dry completely before moving to the next step. This is where patience matters. Sealing damp wood is one of the most common mistakes homeowners make, and it traps moisture inside rather than keeping it out.
Sealing and Waterproofing The Real Defense
If your deck hasn’t been sealed in the last two to three years, this fall is the time. A quality penetrating sealer soaks into the wood fibers rather than sitting on top, which means it moves with the wood as it expands and contracts instead of cracking off.
For pressure-treated lumber, look for a sealer with UV inhibitors and water repellents. For cedar or redwood, a clear or lightly tinted penetrating oil preserves the natural color while protecting the grain. Composite decking generally doesn’t need sealing on the surface, but the cut ends anywhere the board was trimmed should be treated with a composite end-cut sealer to prevent moisture absorption.
Pay particular attention to end grain. The cut ends of boards absorb water at a dramatically higher rate than the face grain, and they’re often the first place rot takes hold. A couple of extra passes with the brush on every exposed end is time well spent.
Apply sealer on a dry day when temperatures are above 50°F. Most sealers need at least 24 hours to cure before rain, and they won’t penetrate properly in cold temperatures. If you’re in a climate where fall temperatures drop fast, this is a task for early October, not late November.
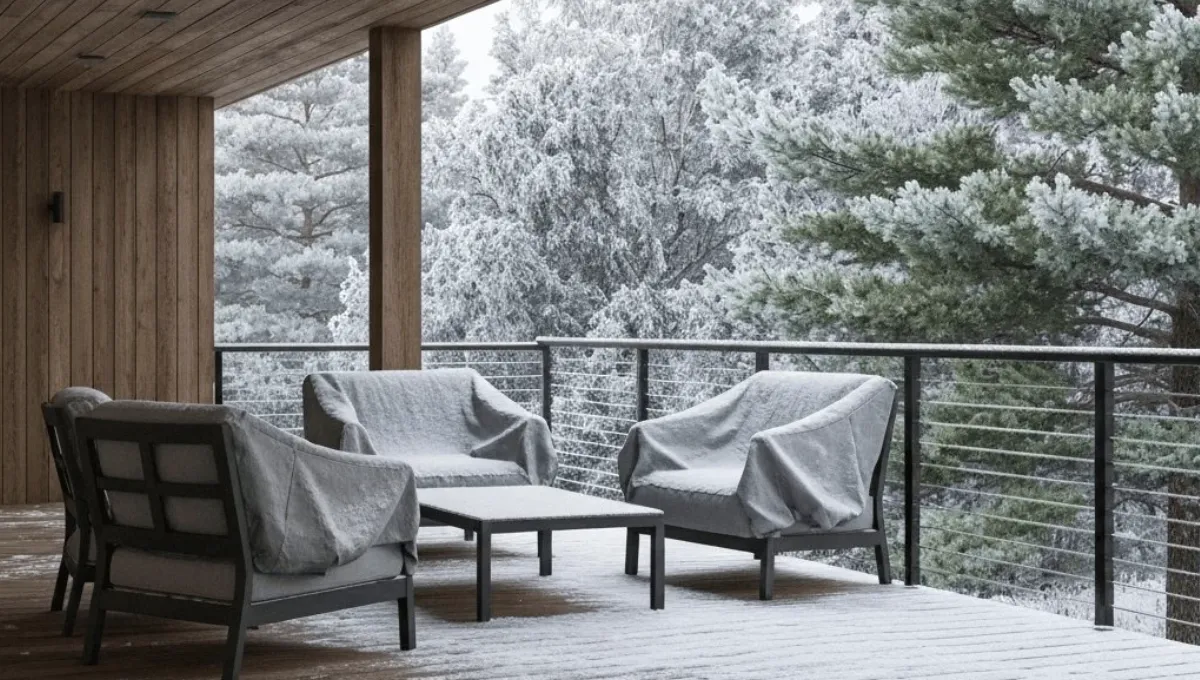
Furniture, Planters, and Everything Else on the Surface
Anything sitting on your deck over winter is a potential problem. Furniture legs trap moisture against the boards. Planters, especially heavy ceramic or terracotta ones, can crack in a hard freeze and leave debris and staining behind. Metal furniture can rust and leave marks that are nearly impossible to remove from wood.
The cleanest approach is to move everything off the deck entirely. Store furniture in a garage or shed, or invest in breathable furniture covers not plastic tarps, which trap condensation and create exactly the humid environment you’re trying to avoid. Breathable covers allow air circulation while keeping the worst of the precipitation off.
If you have a grill on the deck, move it away from the house and cover it properly. Grease drips over winter can stain and soften wood, and a grill sitting against the house is a fire risk even when it’s not in use.
For planters you want to keep outside, move them to a covered area or elevate them on pot feet so water can drain freely underneath. A planter sitting flat on a deck board through a wet winter is almost guaranteed to leave a ring of discoloration.
Hardware, Railings, and the Details That Matter
Metal hardware is often the first casualty of a hard winter. Screws, joist hangers, post caps, and railing brackets are all vulnerable to rust, and rust doesn’t just look bad it stains the surrounding wood and weakens the fastener’s grip over time.
Inspect every visible piece of hardware and look for early rust. A wire brush and a coat of rust-inhibiting primer can extend the life of hardware that’s just starting to show surface oxidation. Anything that’s already deeply corroded should be replaced before winter, not after.
Tighten every fastener you can reach. Freeze-thaw cycles work loose connections even looser, and a railing that’s slightly wobbly in November can be genuinely unsafe by March.
If your deck has lighting post cap lights, stair lights, or string lights check that all fixtures are rated for outdoor use and that no wiring is exposed or cracked. Water and electricity are a combination that doesn’t improve with cold weather.
Wood vs. Composite: Different Materials, Different Needs
The winterizing process looks slightly different depending on what your deck is made of, and conflating the two can lead to wasted effort or actual damage.
Natural wood pressure-treated pine, cedar, redwood, ipe needs the full treatment: cleaning, drying, sealing, and careful inspection for rot and checking. It’s a living material in the sense that it still responds to moisture and temperature long after it’s been cut and installed. Treat it accordingly.
Composite decking is more forgiving but not maintenance-free. It doesn’t need sealing on the face, but it does need to be clean going into winter. Mold and mildew can grow on the surface of composite boards just as readily as on wood, and some composite products are more porous than their manufacturers suggest. Check the manufacturer’s recommendations for your specific product some composites have specific cleaning requirements that a generic deck cleaner can violate.
The substructure under composite decking is often still wood, which means everything about inspecting joists, ledger boards, and hardware applies regardless of what’s on top.
Snow Management Through the Season
Even a well-prepared deck needs some attention during winter itself. Snow accumulation isn’t usually a structural problem for a properly built deck, but ice is a different matter.
If you need to clear snow, use a plastic shovel rather than metal. Metal edges can gouge wood and scratch composite surfaces. Shovel with the grain of the boards, not across them, to avoid catching on any raised edges.
Avoid using rock salt or calcium chloride ice melts on wood decks. Salt accelerates the corrosion of metal fasteners and can dry out and damage wood fibers over time. Sand provides traction without the chemical damage. For composite decking, check the manufacturer’s guidance some products are compatible with certain ice melts, others aren’t.
The real goal through winter isn’t to keep the deck perfectly clear. It’s to prevent ice dams from forming at the edges and to make sure drainage paths stay open so meltwater can run off rather than pooling and refreezing.
A deck that goes into winter clean, sealed, and properly inspected doesn’t need much from you until spring. And when spring does come when you’re pulling the furniture back out and firing up the grill for the first time you’ll know exactly why those few hours in October were worth it.